Small search at the bottom of the attic .... I found the pictures ..... Let's hope it lasts.gif)
Welcome guest, is this your first visit? Click the "Create Account" button now to join.
Results 1 to 3 of 3
-
15th March 2019, 06:46 PM #1
 Tuto Change Icon SpeedCam : Step by Step


It is a request made often on the forum so I tried to simplify to the maximum.
You can even [Only registered and activated users can see links. ] that can be complementary with that one.
Prerequisites: Dview, RAR, and Photofilter or Paint (Yes it's simple but effective)
Objective:Change Speedcam Icon
Realization: Step by Step
(I chose as an example the Speedcam.zip file of the last Skin of Frontzosd) Excellent work as usual dear friend
Extract the Speedcam.zip file ==> speedcam
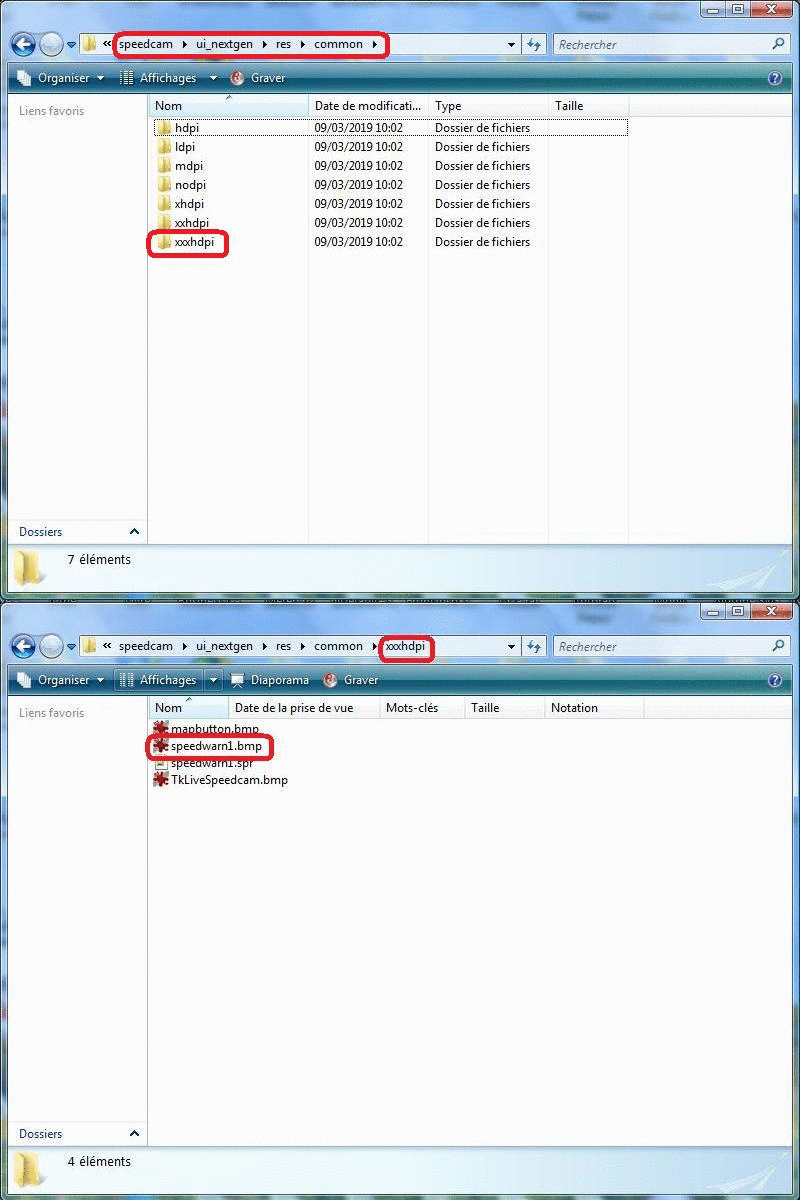
Go to: speedcam / ui_nextgen / res / common / xxxhdpi.
We choose the folder that contains the largest images and work on it because it will be much easier later to resize in smaller.
The file to modify is: speedwarm1.bmp it is a NNG BMP file can be visualized and converted by Dview.
Spoiler: Gif1
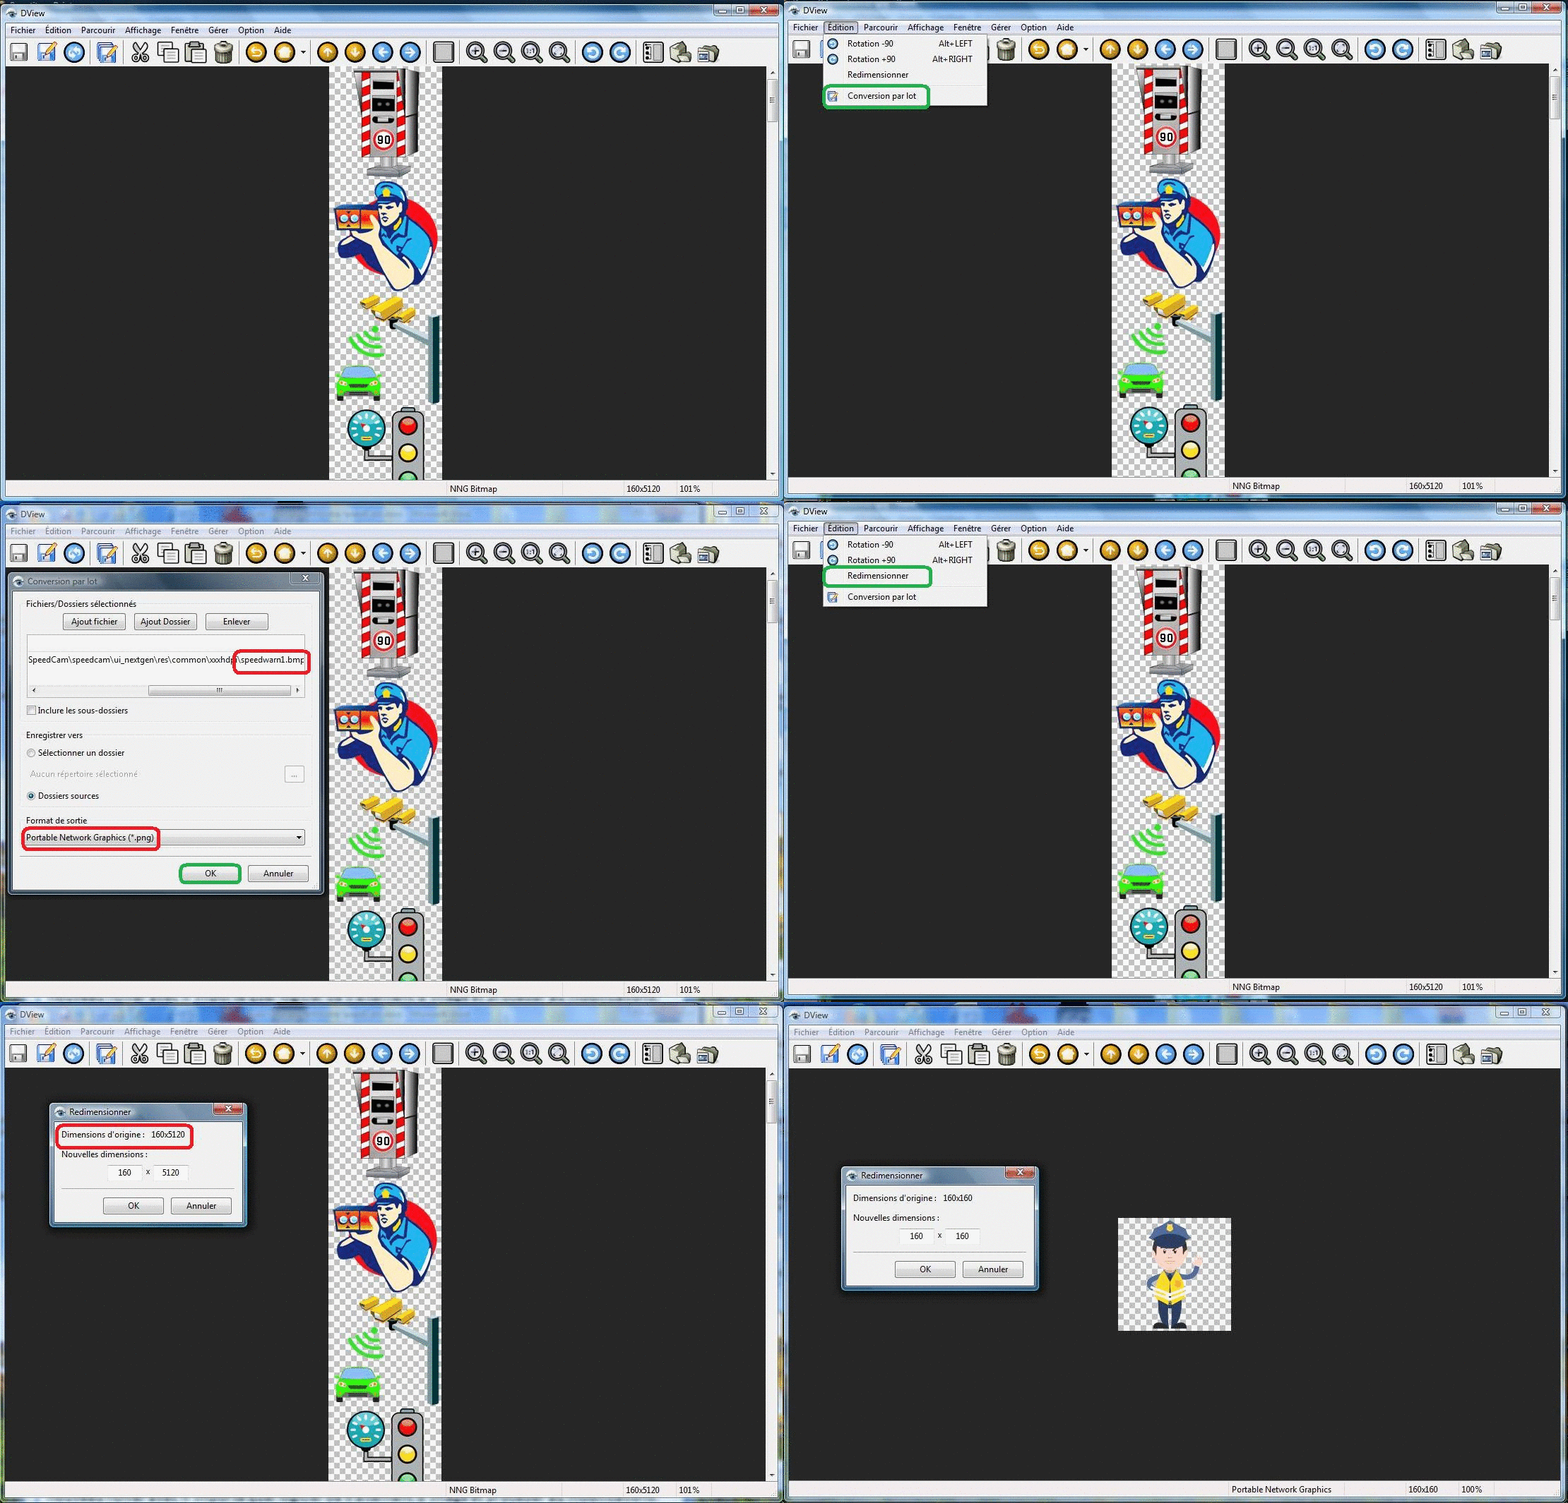
Convert the speedwarm1.bmp file to speedwarm1.png with Dview. The new file can be manipulate with any image processing software and makes the changes.
Now we must make small calculations: the file is composed of 32 successive Icons of identical size 160 X 160 its overall size is 160 X 5120 (5120 = 160 X 32)
Prepare the substitution file which must have a size 160 X 160 on a transparent background in extension .png that I call RPS Post.
The file to change: RPS Post is in position 23 its coordinates are located from 3680
3680 = 160 X 23
Spoiler: Gif2
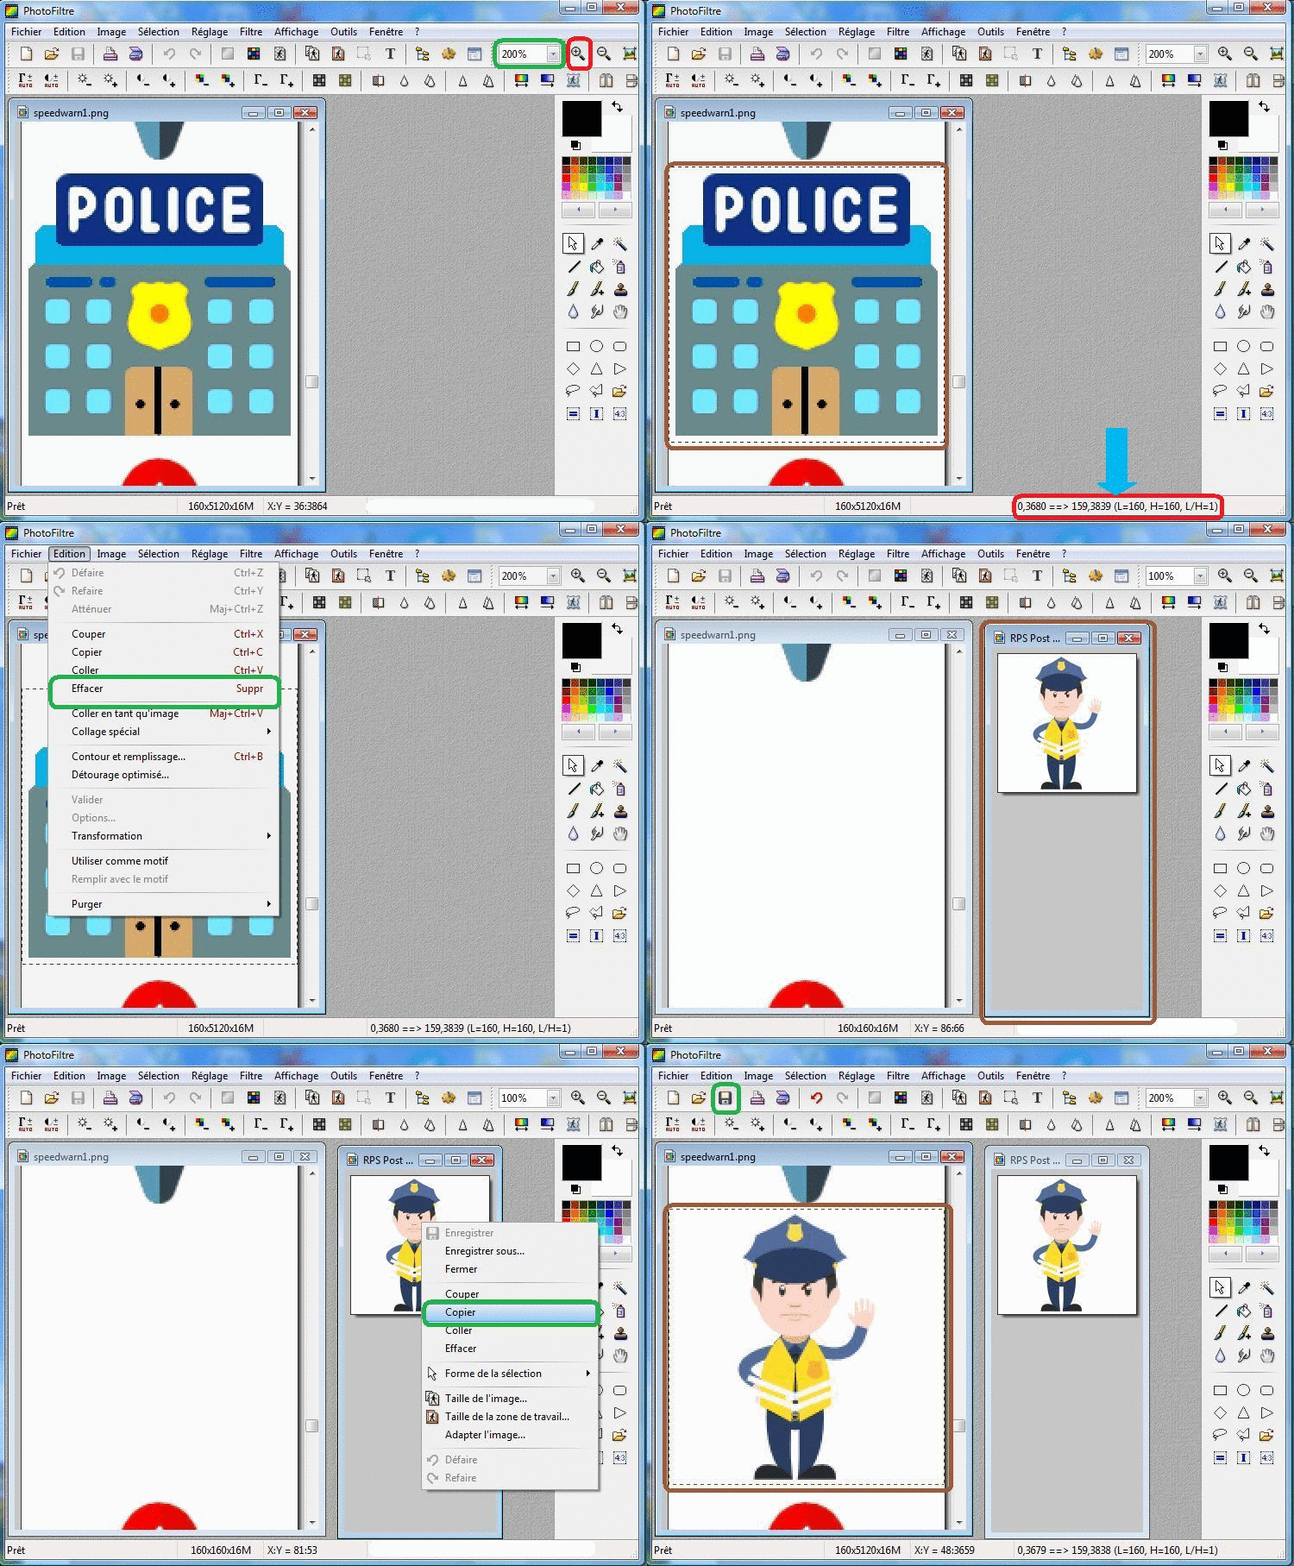
Open the speedwarn1.png and RPS Post.png files with Photofilter. Do not hesitate to use the Zoom
Point selection cursor to 0.3680 (see below and right) and Select the image to change on an area of 160 X 160.
Click on Edit / Clear
Especially Without Moving Cursor Click New Edition / Select and Copy RPS Post.png
Paste on speedwarn1.png and it will replace the old one exactly in the same place.
Save.
Spoiler: Gif3
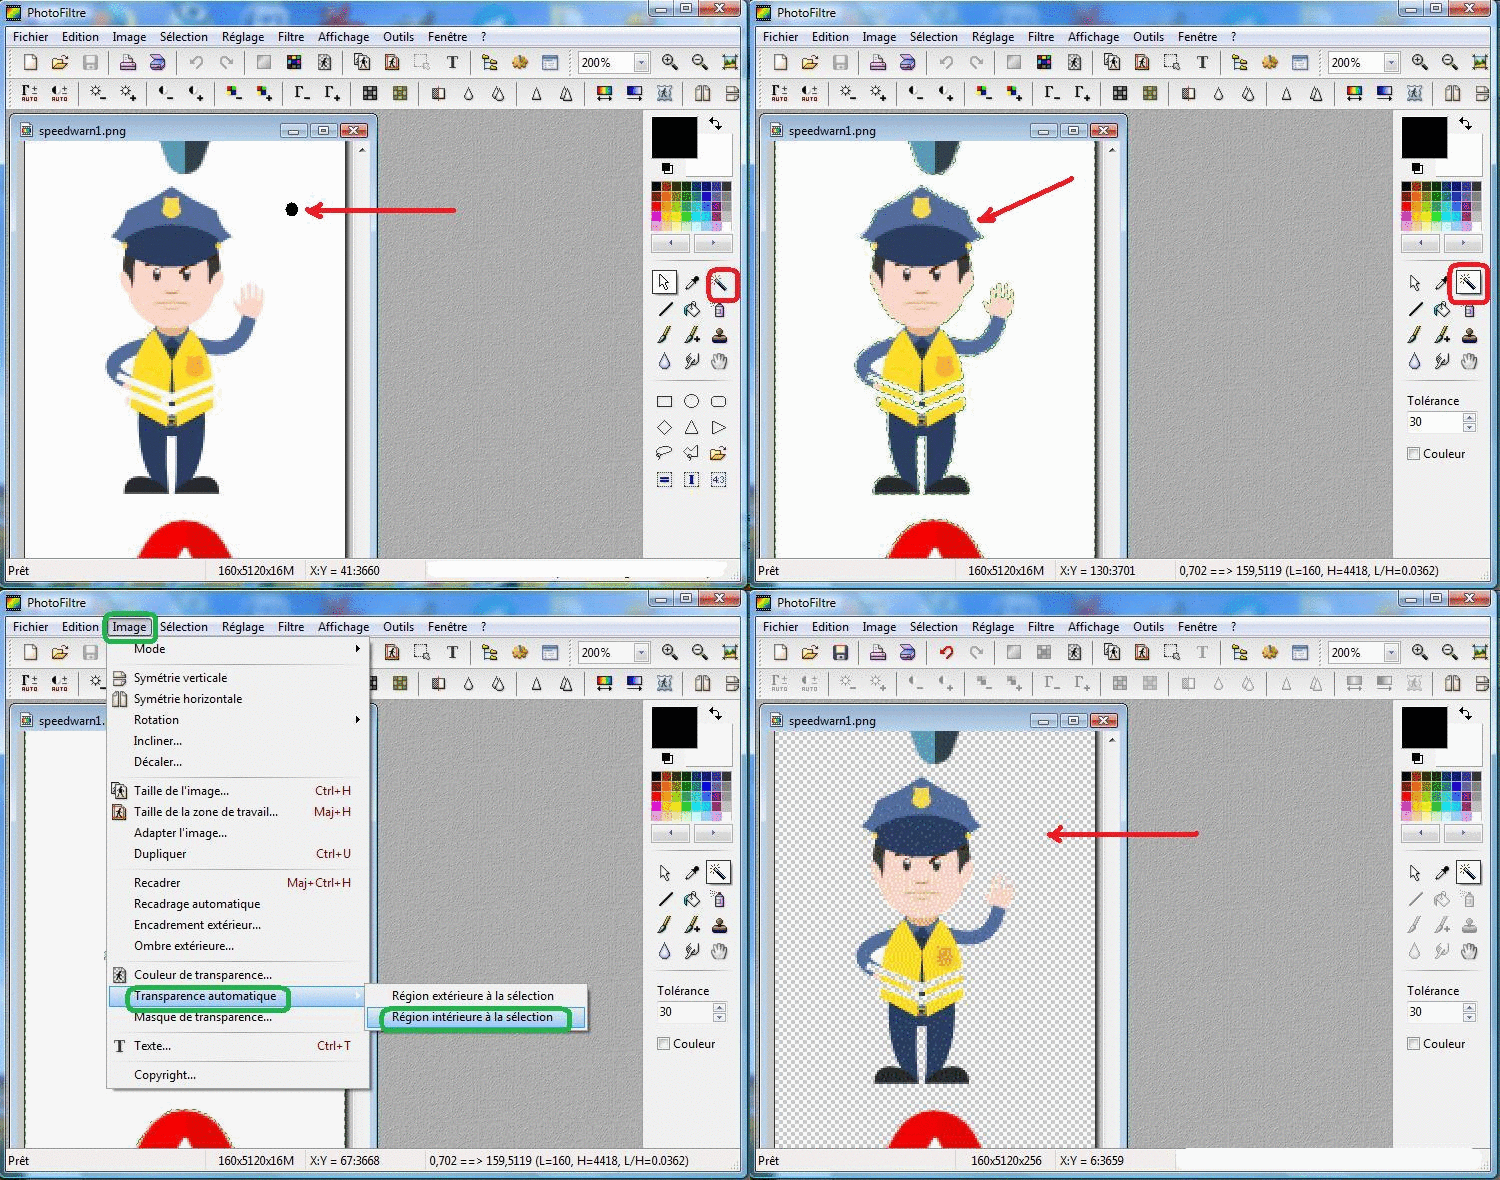
For transparency we use the Magic Wand Tools we click on a point outside the icons.Which select the peripheral zone.
Image Transparency Automatic / Inner region has the selection.
We do not hesitate to do this again if necessary to have all the background transparent. Save
We get a speedwarn1.png file with the new RPS Post icon
Spoiler: Gif4
We proceeded to its conversion of the file in NNG bmp with Dview and with the Drag-and-Drop process it is put back in speedcam.zip/ui_nextgen/res/common/xxxhdpi it will replace by overwriting the old file already in the UX.
We redimmentionne again the file always in NNG bmp to make the replacements in the rest of the files: xxhdpi, xhdpi, hdpi mdpi and ldpi respecting the same dimensions already existing.
This Tuto is long. There are other methods shorter and more effective, Wait for your sugestions.
RegardsLast edited by LouBouha; 22nd November 2020 at 03:30 PM. Reason: Renewal of Pictures
GPS: TomTom ONE
Smartphone: THL T11 Android 4.2.2 Resolution 720x1280
Sygic 14.3.4 IGO Primo 9.6.29.636868 Skins : Doupas V9.0h , Dimka/Frontzosd
-
22nd November 2020, 03:32 PM #2
 GPS: TomTom ONE
Smartphone: THL T11 Android 4.2.2 Resolution 720x1280
Sygic 14.3.4 IGO Primo 9.6.29.636868 Skins : Doupas V9.0h , Dimka/Frontzosd
-
9th August 2023, 08:40 AM #3

The calculator has changed a bit, for example in the Nextgen skin Pongo 2023year.
[Only registered and activated users can see links. ]
xxxhdpi 160 X 6400 (6400 = 200 X 32) window size is width="160px" height="200px"
xxhdpi 120 X 4800 (4800 = 150 X 32) window size is width="120px" height="150px"
xhdpi 80 X 3200 (3200 = 100 X 32) window size is width="80px" height="100px"
mdpi 40 X 1600 (1600 = 50 X 32) window size is width="40px" height="50px"
idpi 30 X 1184 (1184 = 37 X 32) window size is width="30px" height="37px"
hdpi 60 X 2400 (2400 = 75 X 32) window size is width="60px" height="75px"


 Likes:


 Reply With Quote


Bookmarks